Thursday, January 27, 2011

Deadline Day :o)

Well - it is official. Today was 1 month since we started this bathroom renovation and we were planning on being done in 1 month. You'll have to cut us a little slack here, our home was built in 1938.... and we have no idea who actually worked on the home. There were a LOT of hiccups in the process that definitely set us back, and a few days here and there that we just needed a breather. Knowing all of this - we aren't that far behind. Tonight we are officially done laying tile! It has been quite awhile since the last post that gave any sort of update on the bathroom - so pictures are truly worth a thousand words here!

Lets see... the vanity and linen cabinet are installed, the butcher block countertop has been cut to size, sanded, sealed with Waterlox and finished with a satin coat. The vessel sinks and faucets have been plumbed and the mirror hung! We finished the electrical and installed all of the outlets and lighting (including the new exhaust fan for the bathroom). We installed the heated floor and put a coat of self-leveling concrete on top to make sure our tile would be level. Also sanded down and painted the pocket door white. We let the concrete set overnight and tested the heated coils in the morning to make sure everything was still working. Heat will be a luxury in a drafty old house - I can't wait!
Heated floor down with the quick set concrete layer
(plus a quick glance at the vanity!)

The heated floor coils are on the entire floor area
and stop by the toilet

Here's a quick glance at the tile on the walls as well

Today I spent a majority of the night texturing the walls to match each bedroom that we removed a doorway from. Since we stole one of the closets in the back bedroom, we had to close up a doorway in that room. 6 coats of mud later, and I'm finally 'stippling' the walls. This is a fancy word for - sand mixed into paint which creates that rough feeling. It is almost a mix between an orange peel texture and a popcorn. Barely there, but not flattened out like a knockdown style would be. It is close enough - and we'll be painting that room soon anyway. (I've picked this one to be the nursery... so new paint colors are coming soon!)
Back bedroom wall with stippling texture
The 2nd doorway that was closed up happens to be what I called the 'secret' closet. There was an original tiny closet in the front bedroom that we had to square off to create room for the tub. We only used this closet to store our suitcases and extra bags - so it's no big deal to lose it. The same texture was done on this wall as well. Just a coat or two of the sanded paint and then I'll paint the color 'Prickly Pear' on this wall so that my closet can be put back together and clothes all hung back up.

The 3rd, and most difficult of the textures is the plaster walls that I had to match in the hallway. This technique takes 2-3 sizes of trowels and many layers of plaster or joint compound. Unfortunately, to match the walls of the hallway I would have to somehow add sand to the mixture so that it has a scratched look to it. I opted out and just went with 3 layers of trowel scrapes in different directions. Since we haven't painted the walls yet to match, it is hard to tell if it will even look good - but from what I can tell - it is good enough ;o) Hehe. We'll see once the first coat of beige goes back on the walls.... that will be the true test! From there, it will either end up with me doing my own technique to the rest of the hallway to match what I did, or trying to figure out what else I can do to somehow add that sanded look. Ugh - I hope it will fabulous with just a coat of paint!
My version of the troweled plaster texture...
I like to think of it as an art piece, haha!
Here's the painted pocket door!
After I was done with the walls, it was time to start helping Brook with the tile floor. Diamond patterns are beautiful and so worth it in the end, but what a pain in the but they are! At least we did the wall tiles last week and had a bit of a break from them! Tonight was much easier, but gravity was not working against us! Brook and I might be frustrated with tile for awhile as looking at it gives me a negative vibe, but we both love how it has turned out so far! We have ordered our shower/tub glass panels and door from a professional company out of Des Moines. They stopped by on Saturday to do any final measurements and will be installing by Feb. 3rd or 4th. This will be the last step - so we may not be able to shower until then, but I can definitely take a bath before then! :o)
Floor is done!
I love the diamond pattern look

Here's a better look at the wall and knee wall

A better look at the new vanity, sinks, faucets
and my favorite mirror
I'm not sure about the rest of you, but I'm a huge fan of HGTV. I almost worship it - when the TV isn't turned to ESPN while Brook is home, it is tuned into Divine Design, Color Splash, Dear Genevieve, Holmes on Homes and my new favorite: Design, Inc. I learn something new everyday and come up with new crazy ideas for projects in our house. One of the more recent ideas was to use a stone cap on our knee wall instead of the typical grouted tile look. Since our knee wall is only 6 inches, if we used tile - it would create one grouted seam all the way up the center of the wall and on top. I wasn't a fan and neither was Sarah Richardson on Design, Inc. Her idea was to use a marble slab for the front as well as the top because it creates a more 'professional' look and you don't have to deal with the corners of grout and tile not matching up, etc. I took the idea and ran with it! We ordered a dark brown granite slab that will cover the top of the knee wall and run down the front of it. I'm super excited and supposedly it will be done tomorrow! I'll believe it when I see it, but if not tomorrow, definitely by Saturday we hope!
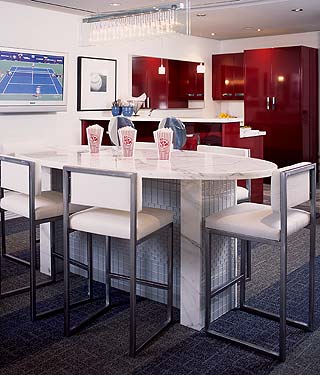
Here is Sarah Richardson's (Design Inc.)
table with the stone caps. It finishes the legs
of this table much better than the tile.
We will take that idea and put in on the top
and front of the knee wall, only ours will be
dark brown granite instead of white marble :o)
Now... if you know who I am married to, or at least the personality type of an engineer, you would understand what I go through on a weekly basis whenever we have projects planned. Brook enjoys his spreadsheets and I enjoy getting emails throughout the day with lists of what needs to be accomplished and what errands need to be run to get them done. Here is the list that I received today :o)

Wednesday: CHECK!
Paint door - Steph
Install door - Brook
Texture back bedroom, front bedroom and hallway - Steph
Cut and install window sill - Brook
Paint window sill - Steph
Lay floor tile - Brook and Steph

Thursday:
Menards run to select vent covers - Brook and Steph
Cut window, floor and door trim - Brook
Cut trim for back bedroom, front bedroom and hallway - Brook
Paint window, floor and door trim - Steph
Paint trim for back bedroom, front bedroom and hallway - Brook
Paint front bedroom wall - Steph
Paint hallway wall - Brook
Paint 3rd coat on bathroom window sill and bathroom door - Steph
Paint back bedroom wall (new nursery color) - Steph
Install vent covers - Brook
Grout all tile - Steph
Use flexible caulk around tiles (all corners, tub, etc.) - Steph

Friday:
Day off! Dinner with Brook's parents and a comedy show

Saturday:
Install granite slabs - Brook
Install toilet - Brook
Install door, window and floor trim - Brook
Install back bedroom, front bedroom and hallway trim - Brook
Seal tile grout - Steph
Install shower head and tub faucet - Brook
Install toilet paper and towel racks - Brook
Cut and router oak transition piece to bathroom - Brook
Stain transition piece to bathroom - Brook
Clean front bedroom (set closet back up, clean room) - Steph
Clean rest of house before Steph's parents come in the afternoon! - Brook and Steph

Looks like we have a lot of work still ahead! It goes pretty quickly though. As long as I can get the grout done the rest will just fly! I'm getting excited though! It is almost a working bathroom!! In the meantime - this is the look I get whenever I walk out of the bathroom..
Poor Cody - he just wants some love!

Tuesday, January 25, 2011

Time flies!


This pretty much sums up what needs to get done. A new blog posting. Maybe tomorrow :o) - I'm exhausted!

Tuesday, January 18, 2011

Under Construction: Day 22

We've made a little more progress since last week. We've been busy taping and mudding the drywall and ceiling. Turns out, that handy little shop vac attachment was a life saver! It didn't suck up all of the dust, but it got the majority of it - so I'm happy with that. I haven't done much of the work this week, so Brook will need the big pat on the back for such a great job he did. You can't even tell where the seams are and it was his first time ever with a project like this! My job will be matching the texture to the exterior walls of the bathroom. We have a custom plaster that is hard to do, but apparently being a designer automatically qualifies me. Yippee! To be honest, I'll be glad to finally have a job that is all mine. I've been working on a lot of this project, but the majority of the work has been done by Brook - because I'm not quite measuring up to the same endurance as I used to be pre-pregnancy. I get winded and dizzy every once in awhile - and have to go chill out for a minute or two.

Now that the walls and the 'building' process are complete... I'll be taking charge of the textured walls, painting and finishing them, as well as the tile. The job will go by a lot faster if one person is laying tile while the other is cutting. Tiling and grouting is my specialty, so cutting will be Brook. Lets just hope we can get it all up and finished before I lose interest and want to move on to something else! :o) Just kidding.

Photos below are the progress of progress since last week. Spent 4 days mudding and sanding the walls. Texture, primer and paint went on today. Cabinets are now in the room, but not yet installed.


Double vanity as you walk in. Fillers will be placed between the wall and right side of vanity as well as between the linen cabinet and left side of vanity.

Part of the linen cabinet. With the fillers in place, this vanity will be about 82" long!

View to the right of the doorway. The unfinished walls will be covered with tile.

Two vanity lights will go above mirror. 


Shower is plumbed!


Next on our list is to start the butcher block countertop. We will measure and cut it out tomorrow to fit the cabinet, then the 8 day process of sealing it will begin on Wednesday.
Also this week we will probably install the heated flooring and use a self-leveling mortar to make sure the tiles don't crack from the difference of space between the under layment and the wiring. Then we'll start the tiling process! Probably one night on the floor, and another on the walls. We are creating a diamond design, so it takes a bit longer to do - but will be worth it in the end.

Hopefully this will be done early next week so we can schedule the professional to come in and measure for the glass panels which will surround the shower/tub. We will also install our granite wall caps to the half wall (whenever they are cut and ready to pick up).

I know I keep repeating myself here, but I'll keep my fingers crossed. This week will be a big one in progress if we actually get things done :o).

Belly pics!

Finally... the photos of my growing belly! Get excited. In the pictures, I'm about 17.5 weeks along and have just finished dinner. As you can see, Brook and I were working on the last of my Better Than Sex Cake. Yum!

Brook looks super excited.

Hopefully I'm showing enough to not be in the 'wow she's gained weight' category anymore... but maybe not.

Close up!

After Brook's pleading to 'lift it up'... here's the actual belly - not hiding behind a sweater.

 So there you have it. The first official photos taken of my belly. A little late, but hopefully we'll keep up so that I have a record of how big I was and... how much bigger I'm going to be!

Thursday, January 13, 2011

Baby Richie update

OK... I swear this will be my last post for today! We've been so busy with the remodel of the bathroom - that I never get to actually post about any updates with this little creature growing inside of me!

According to my iPhone App "What to Expect When You're Expecting" I am 17 weeks and 2 days and this baby is the size of a sweet potato (5.5 inches and .5 oz). There is no longer a 'is she gaining weight or is she pregnant' question anymore. At least with the closer friends that see me, they definitely can tell. Strangers at the YMCA on the other hand, probably just look at me like I ate a few too many fudge pieces at Xmas time. Either way, yes - sweets are my enemy and they never seem to go away - but I am getting bigger. A LOT bigger. I feel a little uncomfortable in my normal clothes, and definitely can tell a difference in my body shape on a daily basis. I'm not a fan of feeling 'big' so I'm not sure how the next 5 months are going to go. Hopefully once I get past the stage where I am just starting to show and am actually more round... things will get better!

I've been working out a bit more, but definitely notice a change in my motivation. I need to keep making myself get on that treadmill and bicycle or stair stepper and just stay there. I might start breaking out the Wii and just do things at home if I can actually find any sort of motivation to press play and have Jillian Michaels yell at me on a daily basis. Maybe I'll start that tomorrow! :o)

Baby Richie is supposedly able to now hear loud noises (great for demo in this bathroom) and it is said that if the baby can get used to these loud noises, they won't be startled as much as newborns. IF this is true, we're in luck! Our dog Cody just loves to make lots and lots of noise, so Baby will be plenty prepared before coming into this world! Cody has actually gotten a lot better in the last few months and is probably just annoyed with how much we're working on the house to do anything other than pout at the front window. Whenever that doorbell rings or someone is here to visit, Cody is right there barking until he has just enough attention (which usually lasts about 3-5 minutes). Let's hope for the best here. I'm not sure we can train him to not bark after 2 years of letting him do it, but we'll try!

I had my 4 week check up on Tuesday and everything was normal. The doctor actually had a hard time keeping track of where Baby was moving. He/She seems to be very active, so I can't wait to see the ultrasound next week so that we can visually see the baby moving, kicking and punching. Sometime in the next few weeks I am supposed to start feeling those punches, so I'd like to see what I'm dealing with to know just how hard these right hooks are going to be.

Someday I'll get photos posted of this belly. I keep putting it off and then somehow we're already into week 17 without a single photo! I promise... this will be done. Soon.

Under Construction: Day 18

I just posted day 1-maybe day 8 or 9 of our construction zone, so I figured it would be a good time to actually catch up and keep the posts coming before I forget what we've been doing in the last 10 days. Oops, too late. The pregnancy amnesia has already set in and I have no idea what we've accomplished. Haha!

Since taking out the hallway wall, we built the pocket door and put up drywall to close off the door during the day/night when we aren't working on this project. We've slowed down just a little bit due to normal full-time jobs, but spend the majority of our nights after work until bedtime working on this bathroom. I've missed two weeks of Grey's Anatomy and Private Practice, but luckily Glee hasn't been new since before Xmas! Hulu is my friend, so once we have time - we'll catch up to the shows!

I guess just posting photos will help visually show you what we've been up to. The last 10 days have been a blur and gone by way too quickly! We've put another layer of under layment on the floor to help raise the level of the room a bit. Built the half wall that will support the tub, glass panels and hide the toilet. We found out that our heat vent goes under the bathtub, so we spent a few days trying to figure out what exactly we wanted to do with the vent and where to put it! In the end, it is running under the tub and will vent out in the half wall. Perfect, easy decision... done. What's next? Insulation was put into the exterior wall and a vapor barrier. We set the tub in place and screwed it into the walls. This baby isn't going anywhere! The last 2 nights have been putting up 'green board' which is a mold resistant drywall. We had friends over for some extra hands to help with the ceiling and Brook and I tackled the walls tonight. DONE and DONE!

New hallway wall and entrance into bathroom
(pocket door is hiding).
Inside the bathroom. Green board is up. To the left will be the double vanity and new linen cabinet.
View to the right of the doorway - bathtub/shower with half wall. Toilet will be behind the half wall.
View from toilet area. Wider doorway into bathroom.
Remaining walls without green board will need tile board.
We're planning the entire back wall and wall to the doorway
to have tile up to the ceiling.
Here's a peak at the door. Of course, we'll be painting it white to match the rest of the doors in the house (even though I love it as is). This will have oil rubbed bronze hardware and a lock...eventually.
Next our plan is to prepare the rest of the walls for tile boards and put them up. Then we will tape and mud the drywall and tile boards until our heart is content! 3 layers of mud, sand, mud some more, sand, mud again for finishing, and sand. I took a little trip to Menards tonight and fortunately stumbled upon a sanding vacuum attachment. PERFECT! Supposedly it sucks all of the white dust straight into the shop vac. I'll believe it when I see it, but it is better than nothing! If all goes well - we plan to have all of this done by Sunday and painting Sunday night. I'll keep my fingers crossed.

Let the Xmas demo begin!

Since it has been TOO many weeks since the last post, I better confess as to why I've been away. Xmas festivities took up a few days and oh what fun that was! We traveled the crazy 3 hour drive up to my parents home for a few days and got to enjoy a 'Winter White Xmas' as they had way too much snow. It is amazing how much of a difference the weather is between the areas of one state! You just have to appreciate the Midwest I guess :o) The family Xmas was fun, lots of people to see and way too many cookies were consumed. Ugh.. oh well - that is what New Years Resolutions are for, right?! On Xmas Day, Brook and I (and dog Cody) drove back home to get to the 2nd family Xmas, only to find a few inches of snow on the ground....phew! No need to spend too much time plowing the driveway, but it was good that the roads were normal and no stress for the ride down. We ate soups and many more goodies (peanut butter homemade fudge... seems to be my new favorite go-to snack)! I got exactly what I asked for - a food scale :o) Hehe! Do you think it will tell me how much that fudge was?

After a long day of opening gifts and celebrating Brook's birthday with the family, we headed home to just relax and get a good nights sleep. I was exhausted... and definitely needed to get into some sweatpants. Jeans these days tend to get a little uncomfortable after a few hours. I'm not sure that I'm a fan of this yet!

Dec 26th, 2010 marks the official day of demolition! That's right, we started our year long (make that... 2 year long) planned out project a little early (well, late in 2010 anyway). The 'Master Bathroom' or technically our main bathroom has been broken down and planned to be built back up. I don't mean your typical change the paint color and a few fixtures either. This is a huge project, probably our biggest yet - so it has been pretty exciting for me. Not to mention, I will ACTUALLY have a bathtub when this is finished....ahhhhhhh relaxation!

Here are a few images to remember the madness...

Before: walking into bathroom

Before: toilet area and shower to the right

Before: inside the 1938 shower....somehow this was classified as a bathtub?

Before: standing by the vanity/window

Day 1-3 were pretty much demo days. Brook and I with sledge hammers and rotary hammers taking the floor to ceiling tile down, breaking into the plaster walls, breaking down those plaster walls to expand the bathroom floor plan, and then tackling the 1930s shower. This was one day of demo in itself. The walls of this shower were made with concrete and wire, multiple inches of it, and thick tile from that era. It was crazy.... completely covered my home in dust and gave me a whole new meaning to a workout. So far, we have taken 7,500 lbs of waste to the local landfill and have one more truck load to be going soon.

Here are some photos of the chaos...

I'm honored to take the first official swing at the tile!

Not much damage... but give me the rotary hammer and I'm off!

Brook working hard!
Using the rotary hammer  for the majority of the tiles.
Tiles down. check! Almost through the wall...

Breaking through to back bedroom closet, CHECK!
Starting to see how much more room we're going to have!
Once the 3 days of the major demo was complete, we spent 2 days redoing all of the copper pipes and venting system that goes under the floor. Took a couple of days off to bring in the New Year with some friends and have gone back at it as much as we can after the workday is over. Happy with the progress so far, but we have a long way to go! Last night we took down the final wall in the hallway and put in our new studs and pocket door frame. Tonight we added drywall to finish out the wall so the cold drafts of winter aren't blowing through the rest of the house.

Everything is down (including the ceiling). Now if the shower would just fall! Please?

Just so you all know... we finally found the sub flooring to this room. After 2 layers of tile and 2 layers of concrete.

Here's a closer view of just how thick the floor was. Try picking THAT up and throwing it out :o)

The shower is finally down! Who knew the 'bathtub' portion was completely lined in copper?!
Bare walls and ceiling. Definitely keeping an eye out for bats and constantly ducking.
Here's a view from the old vanity spot and toilet area. Door on the left is the original bathroom door. Door on the right is where the old linen cabinet used to be (opened from the hallway).
Brook finishing up the new subfloor.

Preparing for the hallway wall to come down! (We are making a larger doorway and turning it into a pocket door - so everything had to go).
He's so strong. Look! No more wall!
This gigantic opening made me almost want french doors....almost :o)
This entry was written on Jan 3rd. I am finally getting photos posted and publishing! Sorry for the long wait, but we've been busy!! :o)